If you’ve ever scheduled a meeting with someone, you’re probably used to sending emails back-and-forth trying to nail down a day and time that works for both of you. The process often involves: checking your calendar, typing days and times in an email, and then waiting for the person to respond. While you’re waiting for them to respond, your calendar might have already filled up leading to even more emails and inefficiency. Once you have finally agreed on a time, whose responsibility is it to create the meeting invite? This tedious process is a waste of time and now there is a much easier way by leveraging your Microsoft’s Bookings with Me.
As of July 2022, your existing subscription to Microsoft likely already includes the (currently in beta/preview) functionality called “Bookings with me”. This feature allows you to share a link with anyone and they’ll be able to view your schedule, and book a meeting in a few clicks. If you’d like to set this up for yourself, keep reading.

What You’ll Need
- Nearly any Office/ Microsoft 365 subscription:
- Office 365: A3, A5, E1, E3, E5, F1, F3
- Microsoft 365: A3, A5, E1, E3, E5, F1, F3, Business Basic, Business Standard, Business Premium
- A web browser (Chrome, Firefox, Safari)
- 5 minutes of your time
How To Set Up Bookings With Me
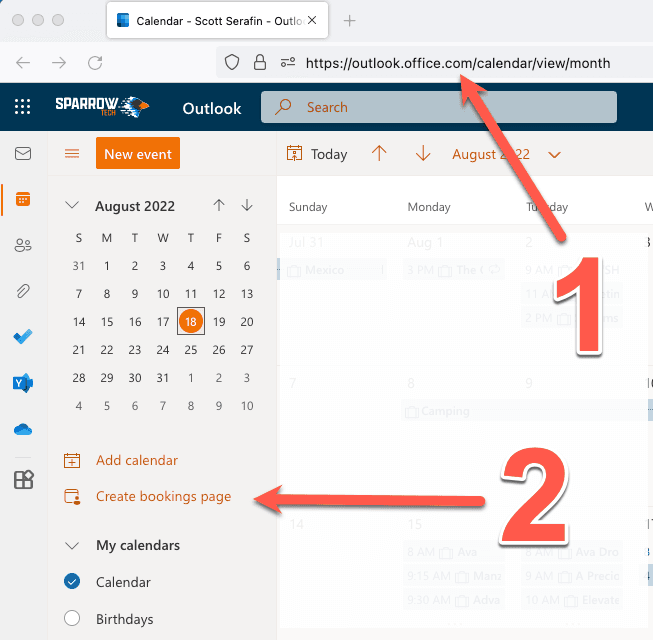
- Go to https://outlook.office.com/calendar/ and sign in with your Microsoft credentials
- On the left-hand side, click Create bookings page
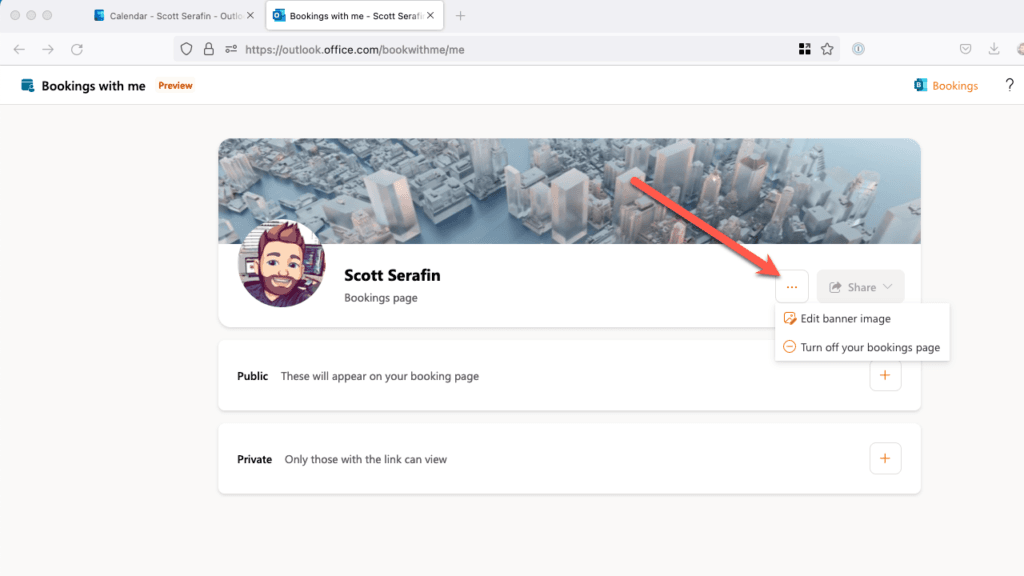
- From here, you can edit your banner image by clicking on the …, then click Edit banner image
- Next, click the + icon next to either Public or Private depending on your preferences for meeting visibility.
- Public: These meetings will be available to anyone with a link to your bookings page
- Private: These meetings will only be available if you send a link directly to this meeting type
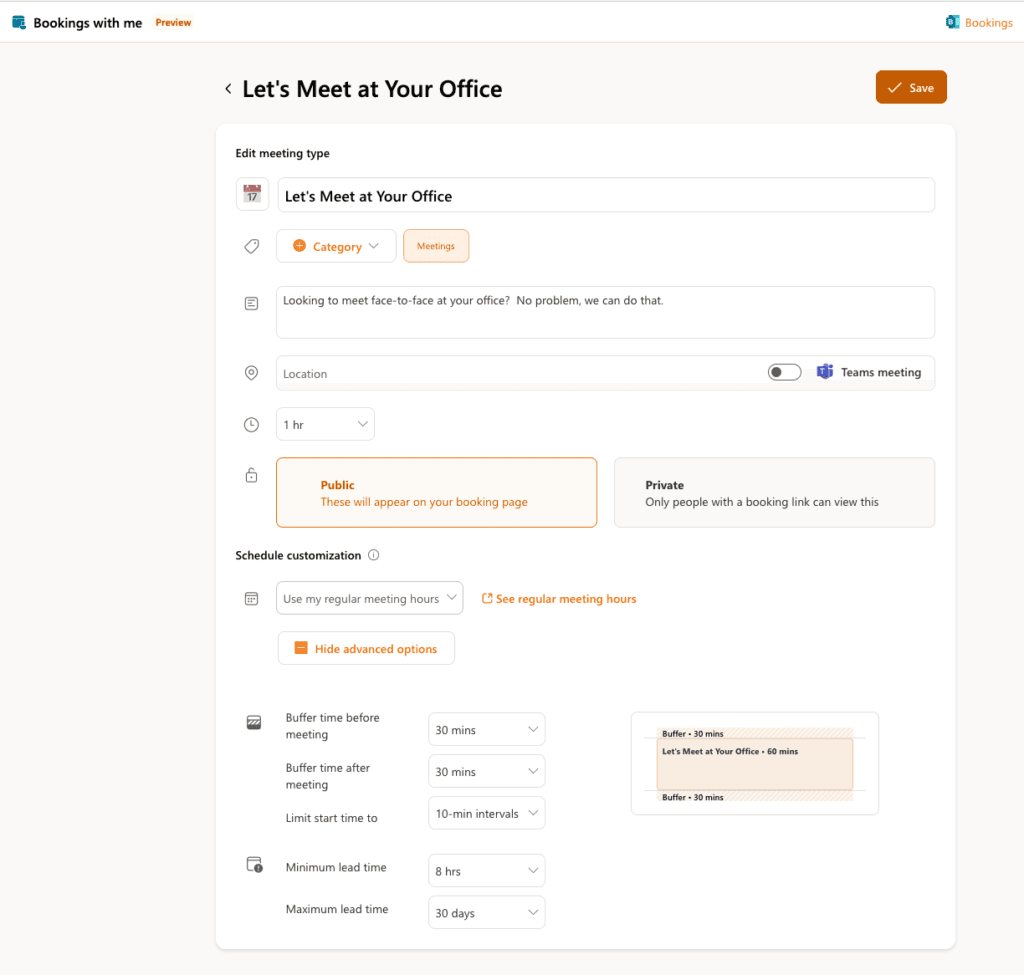
- Now you will fill in all of the relevant information and details about your meeting option
- Emoji and Meeting Name
- Category: If you leverage categories in Outlook, you can automatically assign one to the meeting
- Description
- Location: Enter a physical address, phone number, and/or select the option to automatically add a Teams meeting link
- Length
- Public / Private
- Schedule: Click the link to view/set your standard working hours, or define a unique set of allowed times specific to this meeting
- Advanced Options:
- Buffer time before meeting: Useful if you need time to prepare before a meeting, or travel to a location
- Buffer time after meeting: Useful if you need time to travel or get to your next meeting
- Limit start time to: Defines what time periods the meeting can be scheduled in (ie: 5 minutes means the meeting could start at any 5 minute interval like 9:15, 9:20, 9:25 and 30 minutes means the meeting can only start in thirty minute intervals like 9:00, 9:30, 10:00)
- Minimum lead time: Specifies how soon before the meeting scheduled start time can someone schedule the meeting with you
- Maximum lead time: Specifies how far out in the future someone can schedule this meeting with you
Start Using Your New Bookings with Me Page
After you’ve finished creating all of your various meeting types, click the Share button to see sharing options. We recommend choosing Copy Link and sharing it via email, or adding it to your email signature. If you use Outlook primarily from a web browser, you can click Add to email signature to conveniently add a link to your signature. The link that is copied will direct anyone with that link to your public-facing Bookings with me webpage. This will display your availability and allow someone to book a meeting directly with you.
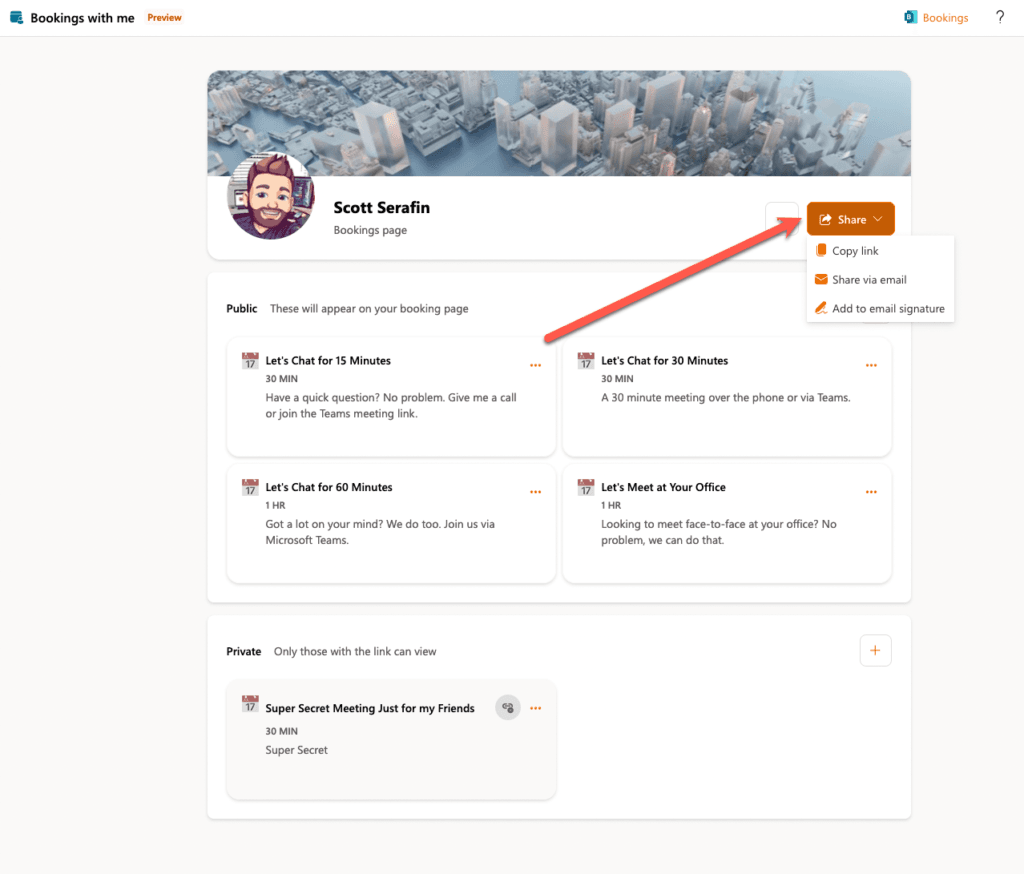
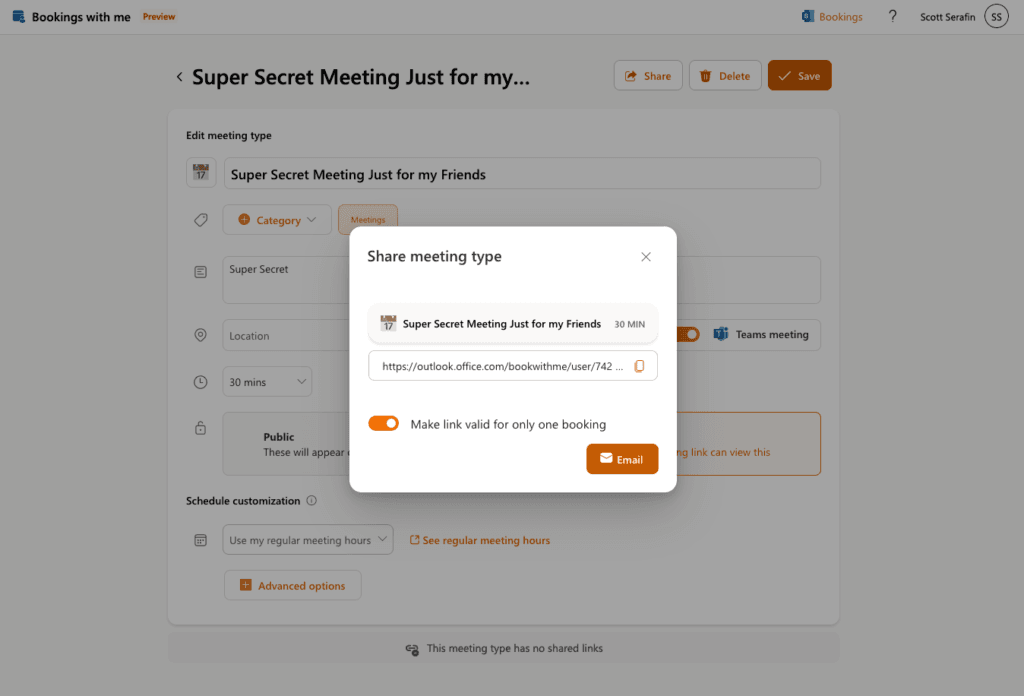
If you wish to share a link to one of your private meetings, click into the meeting and then click the Share button. The dialogue that pops up allows you to create a unique join link directly for that meeting. You can select the toggle for Make link valid for only one booking so that the link can only be used once and not shared by your recipient with others.
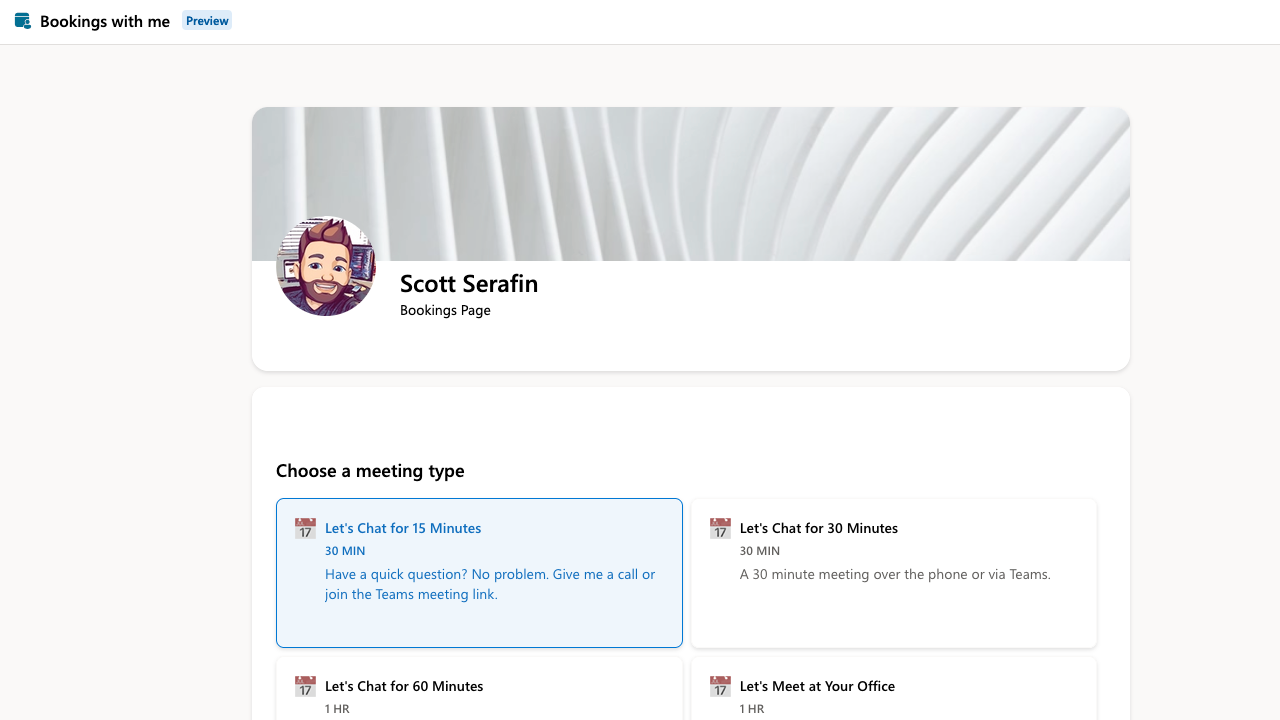
What Does It Look Like
You may be wondering: What does the experience look like for someone booking an appointment with me? Here’s a link to my “Bookings with me” page so that you can see for yourself. When your visitor first clicks your link, they are prompted to sign in with Microsoft (if they are not already), or to continue as guest. Once logged in, they can chose their desired meeting type and find an available time. Upon clicking next, they will be prompted to fill their name and email address if they are a guest, and they have an opportunity to add their own notes with the booking appointment. If they are logged in as a guest, they will also need verify their email address with a 6 digit code that is emailed to them before they can fully book.
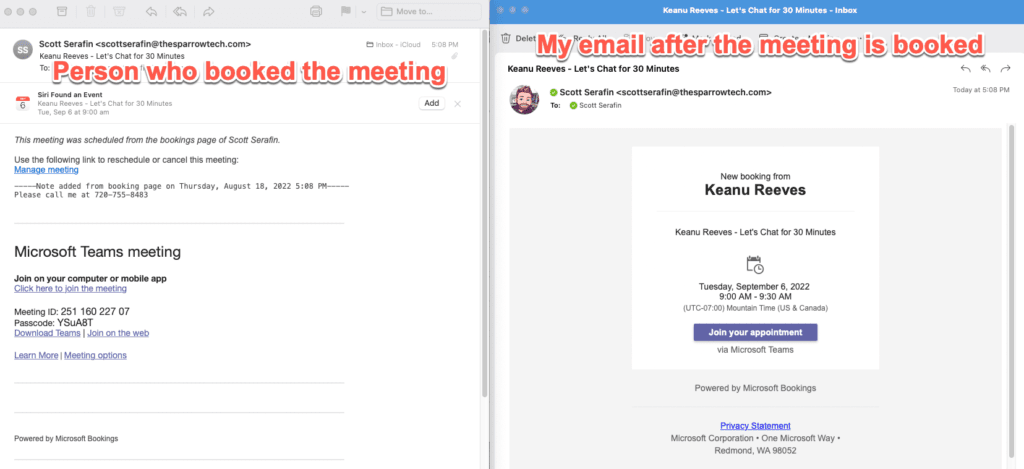
Once the appointment has been successfully created, both you and the person booking the appointment will receive an email with all of the pertinent details. The person who booked is also given a unique link to modify their appointment if they need to reschedule or cancel the meeting. Because the booking is with you, a meeting appointment is automatically created on your calendar with all of the information as well.
Looking to Do More in Microsoft 365?
If you want to get the most of your Microsoft subscription, give us a call! Your Microsoft subscription is loaded with features that you can take advantage of to help automate tasks and improve your business efficiency. Our expert team is here to help you get as much value as possible!